![[6 Steps] Build Your First Calculator App in Android Studio](https://www.csestack.org/wp-content/uploads/2020/04/android-app-calculator.jpg)
Do you want to learn and develop your first Android App?
Don’t worry. Building a basic Android app is not as difficult as it was earlier. There are a lot of tools and development kit available which makes development easy.
Here, I’m sharing my experience developing my first Android App from scratch.
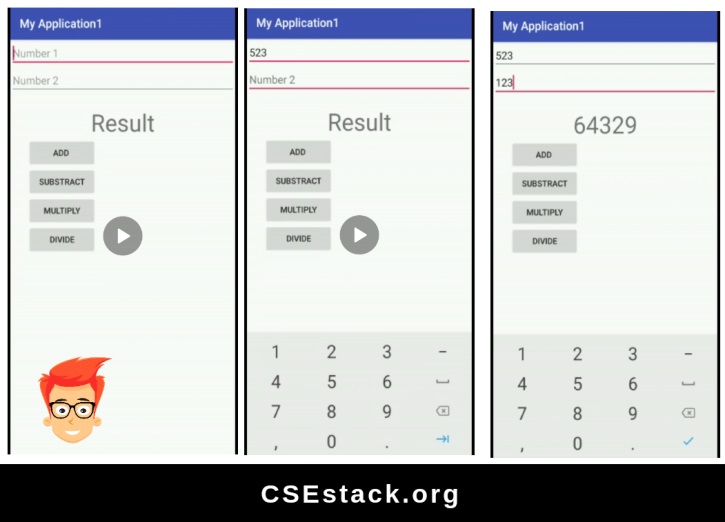
Just don’t read this article. I want it to be more practical. If you follow all the steps, at the end of this tutorial, you will develop your own android app as below.
This tutorial is for beginners so I will cover all required details.

Table of Contents
What is a Prerequisite for learning Android App?
For developing any basic Android app, basically you need JAVA, XML and KOTLIN to a certain extent.
You must have basic knowledge about the programming languages used for developing mobile applications.
You don’t have to be an expert in Java. Basic knowledge is enough for now.
Not its time to set the development environment.
Before starting any project in android development, you must have JAVA JDK installed on your local computer system.
You have to download the JAVA SDK software, install it and then set the environment variable path.
If you don’t have it installed, follow the steps to install Java SDK.
Once you are done with JAVA JDK then go for the installation of Android Studio.
Android Studio is available for Windows, Linux and Mac and Chrome OS. Choose based on your system and configuration.
Follow below steps:
Note: If you don’t understand any setting while installation, just keep doing “Next” without customizing anything. Keep all the default setting.
Awesome!
You are all set to develop your first Android app and make wonders 🙂
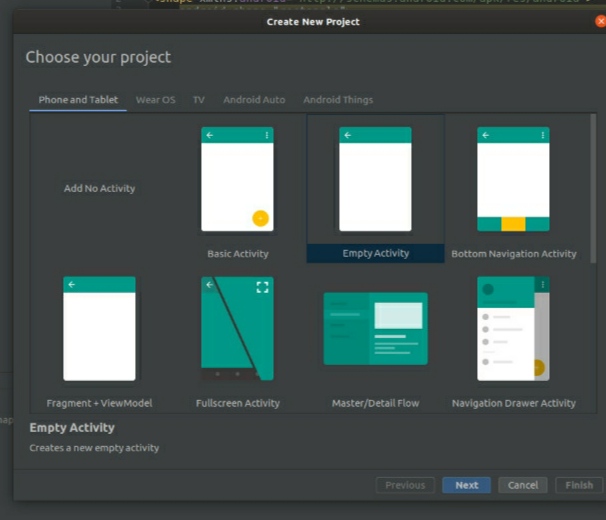
Follow this step-by-step guide to develop your first Android application.

That’s all!
Now you are ready to write your code and develop what you want to see in your first Android project.
You will be able to see two files with extension (.xml )and (.java).
Code written in XML is responsible for the Front end (User Interface) and the Code written in JAVA is responsible for backend functionalities.
Here’ I’m developing Basic Calculator as my first project.
There are two things- developing UI (front-end) and functionality (back-end).
Let’s see the XML code first.
Open file activity_main.xml in your Android Studio and add below lines of code.
You can find this file at the given location in Android studio.
res\layout\activity_main.xml
XML Code
<?xml version="1.0" encoding="utf-8"?>
<LinearLayout xmlns:android="http://schemas.android.com/apk/res/android"
xmlns:app="http://schemas.android.com/apk/res-auto"
xmlns:tools="http://schemas.android.com/tools"
android:layout_width="match_parent"
android:layout_height="match_parent"
tools:context=".MainActivity"
android:orientation="vertical">

<LinearLayout
android:layout_width="match_parent"
android:layout_height="wrap_content"
android:orientation="vertical">

<EditText
android:layout_width="match_parent"
android:layout_height="wrap_content"
android:id="@+id/war"
android:inputType="number"
android:hint="Number 1"/>

<EditText
android:layout_width="match_parent"
android:layout_height="wrap_content"
android:id="@+id/car"
android:inputType="number"
android:hint="Number 2"/>

<TextView
android:layout_width="match_parent"
android:layout_height="wrap_content"
android:gravity="center_horizontal"
android:id="@+id/home"
android:text="Result"
android:layout_marginTop="20dp"
android:textSize="40sp"
/>

</LinearLayout>

<Button
android:layout_width="120dp"
android:layout_height="wrap_content"
android:text="ADD "
android:layout_marginLeft="30dp"
android:id="@+id/RASCAL"/>

<Button
android:layout_width="120dp"
android:layout_height="wrap_content"
android:text="SUBSTRACT"
android:layout_marginLeft="30dp"
android:id="@+id/jh"/>

<Button
android:layout_width="120dp"
android:layout_height="wrap_content"
android:text="MULTIPLY"
android:layout_marginLeft="30dp"
android:id="@+id/AT"/>

<Button
android:layout_width="120dp"
android:layout_height="wrap_content"
android:text="DIVIDE"
android:layout_marginLeft="30dp"
android:id="@+id/SP"/>

</LinearLayout>
Code Explanation:
Similar to HTML there are tags in XML. Lets check all the XML tags we used in our code.
These tags are used to create multiple entities to display on the screen. It is similar to the HTML tags we used to display the entities on the web pages.
1. How to take user input using Edit Text component?
This tag is used to take the user input.
You can add pretext (hint) in the edit field text bar. Users can rewrite over it when the app is working.
This user input data is used by app to process and manipulate the data.
2. How to set Text View component?
If you want to write something on the app screen then you can do so inside the Text view. It is similar to creating labels on the screen.
You can set the text view size. It is generally given in ‘SP’
3. How to create button in Android App?
When we have to provide any button in an app then this tag is used.
The ‘ADD’ , ‘SUBSTRACT’, etc all are buttons.
4. What is Wrap_Content?
Sometime, the data in the view exceed the screen size.
It is basically used when you need to wrap the button or text when size of it exceeds the height or width. It wraps the widget.
5. android:id
Every button, text and edit view has given unique ID.
Example:
android:id="@+id/home"
This is the id I have given to Text ‘Result’.
Now let’s see the JAVA code.
Open file MainActivity.java in your Android Studio and add below lines of code.
You can find this file at the given file path in Android studio.
app\java\com.example.com\MainActivity
Java Code
package com.example.myapplication1;

import androidx.appcompat.app.AppCompatActivity;

import android.content.Intent;
import android.os.Bundle;
import android.view.View;
import android.widget.Button;
import android.widget.EditText;
import android.widget.TextView;

public class MainActivity extends AppCompatActivity {
  private Button op, btn,l,abc;
  EditText num1, num2;
  TextView res;

  @Override
  protected void onCreate(Bundle savedInstanceState) {
    super.onCreate(savedInstanceState);
    setContentView(R.layout.activity_main);

    op = findViewById(R.id.jh);
    l=findViewById(R.id.AT);
    abc=findViewById(R.id.SP);
    num1 = findViewById(R.id.war);
    num2 = findViewById(R.id.car);
    res = findViewById(R.id.home);
    btn = findViewById(R.id.RASCAL);

    op.setOnClickListener(new View.OnClickListener() {
      @Override
      public void onClick(View v) {
        int n1, n2, result;
        n1 = Integer.parseInt(num1.getText().toString());
        n2 = Integer.parseInt(num2.getText().toString());
        result = Math.abs(n1 – n2);
        res.setText(String.valueOf(result));
      }
    });

    btn.setOnClickListener(new View.OnClickListener() {
      @Override
      public void onClick(View v) {
        int n1, n2, result;
        n1 = Integer.parseInt(num1.getText().toString());
        n2 = Integer.parseInt(num2.getText().toString());
        result = Math.abs(n1 + n2);
        res.setText(String.valueOf(result));
      }
    });

    l.setOnClickListener(new View.OnClickListener() {
      @Override
      public void onClick(View v) {
        int n1, n2, result;
        n1 = Integer.parseInt(num1.getText().toString());
        n2 = Integer.parseInt(num2.getText().toString());
        result = Math.abs(n1 * n2);
        res.setText(String.valueOf(result));
      }
    });

    abc.setOnClickListener(new View.OnClickListener() {
      @Override
      public void onClick(View v) {
        int n1, n2, result;
        n1 = Integer.parseInt(num1.getText().toString());
        n2 = Integer.parseInt(num2.getText().toString());
        result = Math.abs(n1 / n2);
        res.setText(String.valueOf(result));
      }
    });
  }
}
When user click on any of the calculator button…
In this code, we used very basic arithmetic functions from Java.
It’s time to run you first Android app.
You don’t need actual mobile to run and test your mobile application. You can use Android mobile simulator in studio
Follow given steps.
If there is no error, you can see the Calculator app running in virtual Android mobile.
If your app UI looks good as per the expectation, there is no issue with the front-end and XML code.
Now check the functionality.
Try clicking on various buttons and test if everything is working fine. Check if you are getting all expected results from the calculator app. If you find any wrong answer, check your Java code.
Wow! You have created your own app.
Isn’t it simple to build first android app?
If you have any questions or issues while developing your first Android app, let me know in the commend.
In the next tutorial, we are going to learn about Android navigation where you can navigate from one screen to another.
All the best!